Google Graph Calculator : Use Google as a Graphics Calculator

Yeah, u guessed it right. Its just about a simple query which you can hit to get a graphical output and that too mathematically.
So here we go.
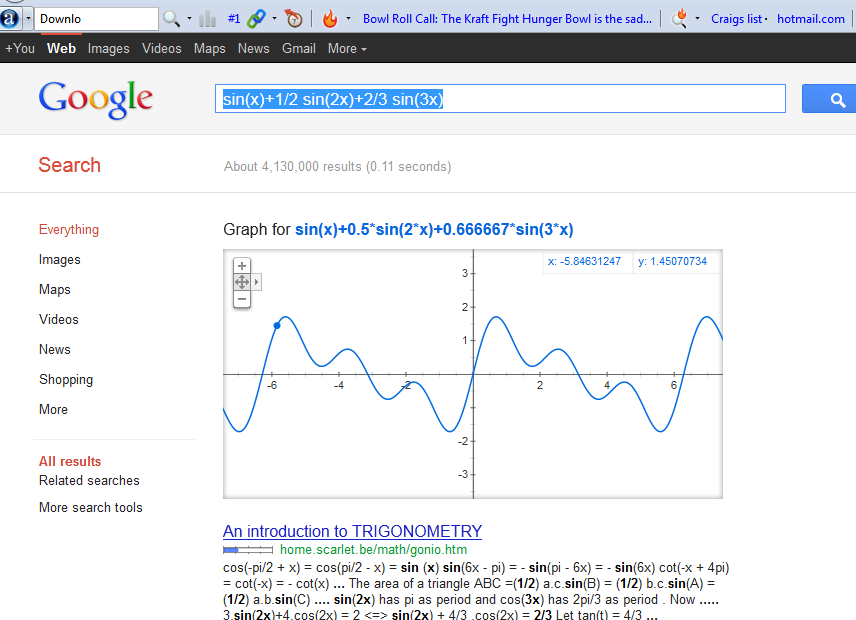
The first demo case i am writing for Engineers [ as i studied with them and then eventually got my stream apart from those]. Lets write a simple Sin(x) function.
Simple Functions
x/2, (x/3)^2

Trignometric Functions
sin(x)+1/2 sin(2x)+2/3 sin(3x)
Sin(x), Cos(x), Tan(x)

Exponential Function
(exp(x)-exp(-x))/2

There are many other operations which can give you some appropriate output as per your requirement.
And the best part lies in the fact that "You can zoom in and out and pan across the plane to explore the function in more detail. You can also draw multiple functions by separating them with commas, "This feature covers an extensive range of single variable functions including trigonometric, exponential, logarithmic and their compositions, and is available in modern browsers".
You can also use Google Chart API Calculator developed by Jon Winstanley. Here is the link : http://www.jonwinstanley.com/charts/
11:49 PM 0
How to crack SQL Server's password Hashes
SQL Server uses an undeclared and undocumented function, pwdencrypt() to produce a hash of the user's password, which is stored in the sysxlogins table of the master database. I guess this is a common known thing which most of the people related to SQL knows. But i never met any article detailing this function. So here i am focusing on the details of this password hash so as to further get deeper with it.
So lets begin with how it looks like.
Using Query Analyzer, or the SQL tool of your
choice, run the following query :
select password from master.dbo.sysxlogins where name='sa'
You should get something that looks similar to the following returned.
0x01008D504D65431D6F8AA7AED333590D7DB1863CBFC98186BFAE06EB6B327EFA
5449E6F649BA954AFF4057056D9B
This is the hash of the 'sa' login's password
on my machine.
Now there is a uniqueness in this password
hashing function. It would give you two different password hashes for the same
password if you put some difference in their time. Design for this password
hash function is made something like if two people use same password then their
hashes will be different – thus would misinterpret you that password is the
same.
Now lets run a case scenario and then lets
study it. Here I am gonna take AAAAAA as the password ad then lets take
a Hash on it using :
Select pwndecrypt(‘AAAAAA’)
Which produces hash
0x01008444930543174C59CC918D34B6A12C9CC9EF99C4769F819B43174C59CC918D34B6A
12C9CC9EF99C4769F819B
The key point here is there are
two password hashes here and these has been concatenated for some advancd
security measure. However luck lies in the fact that we ca crack them separately
as well. This has actually do have 4
parts :
- 10x0100
- 284449305
- 343174C59CC918D34B6A12C9CC9EF99C4769F819B
- 43174C59CC918D34B6A12C9CC9EF99C4769F819B
As you can see 3rd and 4th parts
are identical [same] which proves that the password is always stored twice. One
of them is normal case sensitive password [which is originally provided] and
the other one is upper case version of the same password. This is seriously
concerning as anyone attempting to attack the hash had got his work reduced by
Half. Moreover, he do not have to give any “case perms [Random caps lock
sequences]” rather he can simply use Upper characters which will reduce the
keyspace required for the same.
Here I am attaching the link for a simple command line
dictionary attack tool.
Click here to get the code.
[ And this program is not coded by me, as my programming is a Null vector. :D ]
[ And this program is not coded by me, as my programming is a Null vector. :D ]
9:16 AM 0
Nmap Kungfu Part 1 - Basic Scanning
Nmap is by far the most popular port scanner available. You
can download it from http://www.insecure.org/,
and it compiles and installs in a breeze on most Windows and Unix operating
systems including Mac OS X (via configure, make, make
install). You can download Windows binaries (along with the required
Winpcap) from http://www.insecure.org/.
One reason why nmap is so useful is that it offers many
different scanning techniques from which you can choose. You can scan for hosts
that are up, TCP ports, UDP ports, and even other IP protocols.
Before we get deep into this Nmap, lets take a look on the basics of Scanning [How scanning is actually done].
When a TCP connection is made to a port, the client sends a TCP
packet with the SYN flag set to initiate the connection. If a server is
listening on that port, it sends a packet with both the SYN and ACK flags set,
acknowledging the client’s request to connect while asking to make a return
connection. The client will then send a packet with the ACK flag set to
acknowledge the server’s SYN. This is referred to as the TCP
three-way handshake. When one side is done talking to the other, it will
send a FIN packet. The other side will acknowledge that FIN and send a FIN of
its own, waiting for the other side to acknowledge before the connection is
truly closed. A RST packet can be sent by either side at any time to abort the
connection. A sample TCP conversation between a client and server is shown
here:
Three way handshake process
-
Client sends SYN to Server: “I want to connect.”
-
Server sends SYN/ACK to Client: “Okay; I need to connect to you.”
-
Client sends ACK to Server: “Okay.”
-
Client and Server send information back and forth, acknowledging each other’s transmissions with ACKs. If either side sends a RST, the connection aborts immediately.Formal Shutdown Process
-
Client has finished the conversation; Client sends FIN to Server: “Goodbye.”
-
Server sends ACK to Client (acknowledging Client’s FIN). Server then sends a separate FIN to Client: “Okay. Goodbye.”
-
Client sends ACK to Server (acknowledging Server’s FIN): “Okay.”
Keep this information in mind while reading through the next few
sections. It will help you to get a better grasp on how nmap and other port
scanners get their information.
Scanning for Hosts
If you care only about determining which hosts on a network
are up, you can use the Ping scanning method (-sP). It
works similarly to fping in that it sends Internet Control Message
Protocol (ICMP) echo requests to the specified range of IP addresses and awaits
a response. However, many hosts these days block ICMP requests. In this case,
nmap will attempt to make a TCP connection to port 80 (by default) on the host.
If it receives anything (either a SYN/ACK or a RST), the host is up. If it
receives nothing at all, the host is assumed to be down or not currently on the
network. If you want only a list of hostnames for the IP range you’ve specified,
try a list scan (-sL).
Flag
|
Description
|
|---|---|
SYN
|
Used to indicate the beginning of a TCP
connection
|
ACK
|
Used to acknowledge receipt of a previous packet or
transmission
|
FIN
|
Used to close a TCP connection
|
RST
|
Used to abort a TCP connection abruptly
|
The basic method of TCP port scanning is to do a TCP connect()
(-sT) to a port to see whether anything responds. This is the same thing
any TCP client would do to make a connection (complete the three-way handshake),
except nmap will disconnect by sending a RST packet as soon as the handshake is
complete. If you want to, you can use an version scan (-sV)
to scan every open port for banner grabbing. Moreover you can use (-O) for detection of Operating system. Following are
some examples of these types of scans:
Default Scan [ -sT]

Version Detection [banner grabbing] using -sV

Operating system Detection [using -O]

In
case you forgets all these switches, don't panic. Just hitting "nmap"
without any switch will pop your screen with complete list of these
switches.
The following table indicates how the –sT, -sV, and
–O scans operate:
Nmap Sends to Host Port
|
Nmap Receives from Host Port
|
Nmap Responds
|
Nmap Assumes
|
|---|---|---|---|
SYN
|
SYN/ACK
|
ACK followed by RST
|
Port is open; host is up.
|
SYN
|
RST
|
–
|
Port is closed; host is up.
|
SYN
|
–
|
–
|
Port is blocked by firewall or host is
down.
|
This is great, but since you’re just making basic TCP connections,
your connection most likely gets logged by the service that answers. Sometimes
you want to be a bit quieter.
For getting more deeper with silent scans, wait for Nmap Kung Fu - Part 2.
Enjoy Hacking, Enjoy Hackplanet.
Video for this part is available at : http://videos.hackplanet.in/2011/11/nmap-kungfu-part-1-basic-scanning.html
8:00 AM 1
Complete list of Web and Database Ports

However port scan is undoubtedly best option, but what if some IDS has been implemented on the remote system? We are gonna put ourselves into monitoring even before starting the attack. So why do this shit?
Why not check the port numbers along with their server type and better give it a try on the basis of default ports as most of the Administrators uses the default ports only.
Here i am listing the ports used on all the popular Web and Database servers which you might need to refer while doing some audit.
|
Port
|
Server
|
|
66
|
Oracle SQL*Net
|
|
80
|
Hyper Text Transfer
Protocol (HTTP)
|
|
81
|
HTTP Proxy,
Alternative HTTP Port, Cobalt Server Administration Port
|
|
443
|
Secure Socket Layer
(SSL)
|
|
445
|
Microsoft SQL Server
over NetBIOS
|
|
457
|
UnixWare/Netscape
FastTrack Server
|
|
1080
|
SOCKS Proxy
|
|
1100
|
Oracle WebCache
Listener
|
|
1241
|
KaZaA
File Sharing Server (HTTP-like protocol)
|
|
1352
|
Lotus Domino (Notes)
|
|
1433
|
Microsoft SQL Server
2000
|
|
1434
|
Microsoft
SQL Server over TCP/IP Redirector
|
|
1521–1530
|
Oracle
|
|
1944
|
Microsoft SQL Server
7
|
|
2301
|
Compaq
Insight Manager, Compaq Survey Utility
|
|
3128
|
HTTP
Proxy (Squid, NetCache, etc.)
|
|
3306
|
mySQL
|
|
4000
|
Oracle WebCache
Listener
|
|
4001
|
Oracle WebCache
Listener
|
|
4002
|
Oracle WebCache
Listener
|
|
4100
|
Sybase 11.0
(jConnect)
|
|
5000
|
Sybase 12.x
|
|
5432
|
PostgreSQL
|
|
5800
|
VNC HTTP Console
Port #1
|
|
5801
|
VNC HTTP Console
Port #2
|
|
5802
|
VNC HTTP Console
Port #3
|
|
6346
|
Gnutella (HTTP-like
protocol)
|
|
6347
|
Gnutella (HTTP-like
protocol)
|
|
7001
|
BEA WebLogic
|
|
7002
|
BEA WebLogic
|
|
8000
|
HTTP Proxy,
Alternative HTTP Port, HP Web JetAdmin Version 6.0
|
|
8001
|
BEA WebLogic
|
|
Port
|
Server
|
|
8005
|
Apache Tomcat
Administration Server (non-HTTP protocol)
|
|
8080
|
HTTP Proxy,
Alternative HTTP Port
|
|
8888
|
HTTP Proxy,
Alternative HTTP Port
|
|
30821
|
Netscape Enterprise
Server Administration Server
|
If you know any other ports, please do add them as comment. :)
8:53 PM 0
Check WiFi Network Performance with Qcheck to Help Improve Throughput
When
you buy network hardware, including a hub/router and network cards, you're told
that hardware's rated speedfor example, 100Mbps for an Ethernet network, or
11Mpbs for an 802.11b WiFi network.
But those numbers only tell you how your network might perform
in ideal conditions; as the saying goes, "your mileage may vary," and it usually
does. WiFi networks are particularly finicky and are especially prone to being
affected by interference and other factors. Where you place your wireless access
point and PCs and how you position their antennas can make a dramatic difference in the
actual speed of your network. So, you'll want to know the true connection speed
of your network, WiFi networks in particular, so that you can optimize their
performance when you troubleshoot them.
But how can you find out your true network performance? If you
have a WiFi card, you can find information about your connection by clicking the
small network icon in the Notification Area (also called the system
tray). When you do that, the Wireless Network Connection Status screen appears.

There's only one problem with that screen: it's highly
inaccurate. True, its little green bars and Signal Strength indication give you
a broad picture of the relative strength of your network connection. But the
Speed indication isn't an actual measurement as far as I can tell; it appears to
tell you only your maximum theoretical connection speed, given the nature of
your hardware, and doesn't reflect your true current connection speed. When I
use my WiFi network, it always tells me the speed is 11Mbps, even when actual,
real-time measurement shows my true throughput is less than half of that.
So, how do you measure the true speed of a network in your
real-world conditions? Get the free
program Qcheck (http://www.ixiacom.com/products/performance_applications/pa_display.php?skey=pa_q_check).

It performs a series of tests, including throughput and response time, and gives
you a good snapshot of your network's real performance. When trying to optimize
a WiFi network, run Qcheck on each PC on the network to get baseline performance
results for each. Then run the test for each PC after you move the base station
and PCs, change the positioning of the antennas, and so forth, as outlined in. That way, you'll be able to fine-tune
your network for optimum efficiency.
Once installed on every machine in your network, Qcheck
measures the performance of the network between any two of your PCs. Qcheck is
made up of two components: the console where you run your tests, and an endpoint,
which runs invisibly in the background on each PC on which you've installed
Qcheck. While the exact metrics vary from test to test, the program works by
sending data from one PC to another on your network. The data is then sent from
the receiving PC back to the originating PC, and Qcheck measures the round-trip
time, calculates throughput, and displays the results.
8:12 PM 0
WEP In a Nutshell

WEP [Wireless Equivalent Privacy] was meant to be an encryption method to provide security
equivalent to a wired access point. WEP was originally designed with 40-bit
keys, and later WEP2 came along to increase the key size to 104 bits. At that time, it was the best encryption technology avalable. However with passage of time, it has been proved to be damn vulnerable and hence WPA 2 has holded the position of most secure wifi security technology.
Neways, lets discuss WEP. All of the
encryption is done on a per-packet basis, so each packet is essentially a
separate plaintext message to send. The packet will be called M.
First a checksum of message M is computed so
the message integrity can be checked later. This is done using a 32-bit cyclic
redundancy checksum function aptly named CRC32. This checksum will be called CS, so CS = CRC32(M). This value is appended to the end of the message, which
makes up the plaintext message P.

Now the plaintext message needs to be encrypted. This is done
using RC4, which is a stream cipher. This cipher is then initialized with a seed
value, so thta it can generate a keystream, which is just a arbitrarily long
stream of pseudo-random bytes. WEP basically uses an initialization vector (IV) for the
seed value. The IV consists of 24 bytes of varied bits that is generated for
each packet. Some older WEP implementations simply use sequential values for the
IV, while others use some form of pseudo-randomizer.
Regardless of how the 24 bits of IV are chosen, they are prepended
to the WEP key. The 24 bits of IV are included in the WEP key size in a bit of
clever marketing spin. (When a vendor talks about 64-bit or 128-bit WEP keys,
the actual keys are only 40 bits and 104 bits, respectively, with 24 bits of
IV.) The IV and the WEP key together make up the seed value, which will be
called S.

Then the seed value S is fed into RC4, which will generate a keystream. This
keystream is XORed with the plaintext message P, to
produce the ciphertext C. The IV is prepended to the
ciphertext, and the whole thing is encapsulated with yet another header and sent
out over the radio link.

When the recipient receives a WEP-encrypted packet, the process is
simply reversed. The recipient pulls the IV from the message and then
concatenates the IV with his own WEP key to produce a seed value of S. If the sender and receiver both have the same WEP key, the
seed values will be the same. This seed is fed into RC4 again to produce the
same keystream, which is XORed with the rest of the encrypted message. This will
produce the original plaintext message, which consisted of the packet message M concatenated with the integrity checksum CS. The recipient then uses the same CRC32 function to
recalculate the checksum for M and checks to make sure the
calculated value matches the received value of CS. If the
checksums match, the packet is passed on. Otherwise there were too many
transmission errors or the WEP keys didn't match, and the packet is dropped.
That's basically WEP in a nutshell. Very soon i would write on What is the Logic when we are hacking a WEP key, which vulnerabilty do we exploit and so on so forth. The tutorial for hacking WEP has already been published by me.Would upload a video very soon too. :)
Have fun, and Enjoy hacking :)
1:21 PM 0
Tool Population For Vulnerability Assessment

A vulnerability assessment tool or scanner is a tool using
which we can automate the process of testing loopholes in a network and
immunity of security system implemented by an organization.
They can be classified as :
a. Host
b. Service
c. Application
Host based tools performs scanning on the system they resides
on, i.e. they do not interact with any other system. Their advantage include
having access to all system resources such as logs, etc. They also work a a faster
rate as compared to other assessment tools. However they can also take large
amount of host machine’s resources and if this was a important node in the
network, this can raise worries on network admin’s face.
Service vulnerability scaners includes tools which scans a
range of host or particular services which are running on them. These can
include simple port scanners (Nmap, angryip, etc) and they can also include
completely automated programs (Acunetix, Nessus, GFI Languard) which can detect live hosts and try to fetch
data from them. This automation can be in terms of banner grabbing or service
identification as well. These automated tools also enable users to create a
report on its own once it completes the assessment.
When we talk about current tool population in the industry,
there are a number of tools ranging from scanners to automated ones. Some of
them which are open source and available free of cost includes :
Ø Microsoft
Baseline Security Analyser ( http://microsoft.com/technets/security/tools/mbsahome.mspx)
Ø Winfingerprint
(http://winfingerprint.com)
Ø OpenVas (http:/wald.intevation.org/projects/openvas/)
Ø Paros (http://parosproxy.org)
Ø Win Vuln Scan
(http://pspl.com/download/winvulnscan.htm)
Ø Nikto (http://www.cirt.net/code/nikto.shtml)
Ø Nessus
Apart from these tools, you must be in touch with latest
vlnerbilty informations. For this purpose you can use these advisories :
1:09 PM 0
Subscribe to:
Posts (Atom)

