
Free Download Flash Den - Premium Flash Template

The Premium Flash Template is a fully configurable and easy to use web template with a lot of great features. You can create attractive functional pages just with a few mouse clicks. The Premium Flash Template supports deep linking, which means that you can link to any specific part of the website. Deep linking also lets you use the browser’s back and forward buttons. You don’t need to download any other 3rd party frameworks to achieve deep linking. It’s built-in and ready to use. It works even for the gallery photos, try it out for yourself and see.
Download Link : http://hotfile.com/dl/25288830/108bc75/www.dl4all.com.Premium_Flash_Template.rar.html
6:29 AM 0
List Of All Hexadecimal Colour Codes
If your blog is looking poor,dull and lacking attracting the visitors,then you will have to spice it up a little bit by changing the colors of sidebars,header,blog posts, trying different combinations and see which color combination best fits your blog.
You can change the color of the blog background,sidebar,etc...by going to(see the below image).

But blogger provides limitied color codes.So,if you want another color that is not in that blogger list,then simply copy the code from the colour chart as show below.

| HTML CODE | COLOR |
| #000000 | |
| #150517 | |
| #250517 | |
| #2B1B17 | |
| #302217 | |
| #302226 | |
| #342826 | |
| #34282C | |
| #382D2C | |
| #3b3131 | |
| #3E3535 | |
| #413839 | |
| #41383C | |
| #463E3F | |
| #4A4344 | |
| #4C4646 | |
| #4E4848 | |
| #504A4B | |
| #544E4F | |
| #565051 | |
| #595454 | |
| #5C5858 | |
| #5F5A59 | |
| #625D5D | |
| #646060 | |
| #666362 | |
| #696565 | |
| #6D6968 | |
| #6E6A6B | |
| #726E6D | |
| #747170 | |
| #736F6E | |
| #616D7E | |
| #657383 | |
| #646D7E | |
| #6D7B8D | |
| #4C787E | |
| #4C7D7E | |
| #806D7E | |
| #5E5A80 | |
| #4E387E | |
| #151B54 | |
| #2B3856 | |
| #25383C | |
| #463E41 | |
| #151B8D | |
| #15317E | |
| #342D7E | |
| #2B60DE | |
| #306EFF | |
| #2B65EC | |
| #2554C7 | |
| #3BB9FF | |
| #38ACEC | |
| #357EC7 | |
| #3090C7 | |
| #25587E | |
| #1589FF | |
| #157DEC | |
| #1569C7 | |
| #153E7E | |
| #2B547E | |
| #4863A0 | |
| #6960EC | |
| #8D38C9 | |
| #7A5DC7 | |
| #8467D7 | |
| #9172EC | |
| #9E7BFF | |
| #728FCE | |
| #488AC7 | |
| #56A5EC | |
| #5CB3FF | |
| #659EC7 | |
| #41627E | |
| #737CA1 | |
| #98AFC7 | |
| #F6358A | |
| #E4317F | |
| #F52887 | |
| #E4287C | |
| #C12267 | |
| #7D053F | |
| #CA226B | |
| #C12869 | |
| #800517 | |
| #7D0541 | |
| #7D0552 | |
| #810541 | |
| #C12283 | |
| #E3319D | |
| #F535AA | |
| #FF00FF | |
| #F433FF | |
| #E238EC | |
| #C031C7 | |
| #B048B5 | |
| #D462FF | |
| #C45AEC | |
| #A74AC7 | |
| #6A287E | |
| #8E35EF | |
| #893BFF | |
| #7F38EC | |
| #6C2DC7 | |
| #461B7E | |
| #571B7E | |
| #7D1B7E | |
| #842DCE | |
| #8B31C7 | |
| #A23BEC | |
| #B041FF | |
| #7E587E | |
| #D16587 | |
| #F778A1 | |
| #E56E94 | |
| #C25A7C | |
| #7E354D | |
| #B93B8F | |
| #F9B7FF | |
| #E6A9EC | |
| #C38EC7 | |
| #D2B9D3 | |
| #C6AEC7 | |
| #EBDDE2 | |
| #C8BBBE | |
| #E9CFEC | |
| #FCDFFF | |
| #E3E4FA | |
| #FDEEF4 | |
| #C6DEFF | |
| #ADDFFF | |
| #BDEDFF | |
| #E0FFFF | |
| #C2DFFF | |
| #B4CFEC | |
| #B7CEEC | |
| #52F3FF | |
| #00FFFF | |
| #57FEFF | |
| #50EBEC | |
| #4EE2EC | |
| #48CCCD | |
| #43C6DB | |
| #9AFEFF | |
| #8EEBEC | |
| #78C7C7 | |
| #46C7C7 | |
| #43BFC7 | |
| #77BFC7 | |
| #92C7C7 | |
| #AFDCEC | |
| #3B9C9C | |
| #307D7E | |
| #3EA99F | |
| #82CAFA | |
| #A0CFEC | |
| #87AFC7 | |
| #82CAFF | |
| #B0E2FF | |
| #566D7E | |
| #6698FF | |
| #736AFF | |
| #CFECEC | |
| #AFC7C7 | |
| #717D7D | |
| #95B9C7 | |
| #5E767E | |
| #5E7D7E | |
| #617C58 | |
| #348781 | |
| #306754 | |
| #4E8975 | |
| #254117 | |
| #387C44 | |
| #4E9258 | |
| #347235 | |
| #347C2C | |
| #667C26 | |
| #437C17 | |
| #347C17 | |
| #348017 | |
| #4AA02C | |
| #41A317 | |
| #4AA02C | |
| #8BB381 | |
| #99C68E | |
| #4CC417 | |
| #6CC417 | |
| #52D017 | |
| #4CC552 | |
| #54C571 | |
| #57E964 | |
| #5EFB6E | |
| #64E986 | |
| #6AFB92 | |
| #B5EAAA | |
| #C3FDB8 | |
| #00FF00 | |
| #87F717 | |
| #5FFB17 | |
| #59E817 | |
| #7FE817 | |
| #8AFB17 | |
| #B1FB17 | |
| #CCFB5D | |
| #BCE954 | |
| #A0C544 | |
| #FFFF00 | |
| #FFFC17 | |
| #FFF380 | |
| #EDE275 | |
| #EDDA74 | |
| #EAC117 | |
| #FDD017 | |
| #FBB917 | |
| #E9AB17 | |
| #D4A017 | |
| #C7A317 | |
| #C68E17 | |
| #AF7817 | |
| #ADA96E | |
| #C9BE62 | |
| #827839 | |
| #FBB117 | |
| #E8A317 | |
| #C58917 | |
| #F87431 | |
| #E66C2C | |
| #F88017 | |
| #F87217 | |
| #E56717 | |
| #C35617 | |
| #C35817 | |
| #8A4117 | |
| #7E3517 | |
| #7E2217 | |
| #7E3117 | |
| #7E3817 | |
| #7F5217 | |
| #806517 | |
| #805817 | |
| #7F462C | |
| #C85A17 | |
| #C34A2C | |
| #E55B3C | |
| #F76541 | |
| #E18B6B | |
| #F88158 | |
| #E67451 | |
| #C36241 | |
| #C47451 | |
| #E78A61 | |
| #F9966B | |
| #EE9A4D | |
| #F660AB | |
| #F665AB | |
| #E45E9D | |
| #C25283 | |
| #7D2252 | |
| #E77471 | |
| #F75D59 | |
| #E55451 | |
| #C24641 | |
| #FF0000 | |
| #F62217 | |
| #E41B17 | |
| #F62817 | |
| #E42217 | |
| #C11B17 | |
| #FAAFBE | |
| #FBBBB9 | |
| #E8ADAA | |
| #E7A1B0 | |
| #FAAFBA | |
| #F9A7B0 | |
| #E799A3 | |
| #C48793 | |
| #C5908E | |
| #B38481 | |
| #C48189 | |
| #7F5A58 | |
| #7F4E52 | |
| #7F525D | |
| #817679 | |
| #817339 | |
| #827B60 | |
| #C9C299 | |
| #C8B560 | |
| #ECD672 | |
| #ECD872 | |
| #FFE87C | |
| #ECE5B6 | |
| #FFF8C6 | |
| #FAF8CC |
7:47 AM 0
Adding Social Bookmarking Buttons To Blogger Posts : COMPLETE GUIDE

What is Social Bookmarking?
Social Bookmarking is an online version of local bookmarking where you can store, organize, search your bookmarks and share with the world. Social bookmarking site’s members share their favourite post, articles or pages with other people. You can not only access your bookmarks but also can access, surf and bookmark other people’s bookmarks. In short social bookmarking sites allow people to share their favourites with other people.

Importance Of Social Bookmarking Sites
This can be called as an alternate to search engines but this is advanced, fast and better. In general when we search something in search engines, it comes with various results. Like wise in social bookmarking sites, when we perform a search, it shows us some of it’s choosen articles. The only difference is that search engines display the sites that the search engine spiders love but here we get the results that the common people love and want to show us. Of course, the taste of people are far better than those scripted search engine spiders.
There are a loads of social bookmarking sites available today like Digg, StumbleUpon, Reddit, Delicious, Technorati, Yahoo Buzz etc. Lets talk about it’s usages. Now if you like this post of mine, you can add this to various social bookmarking sites. When you add this to social bookmarking sites, other members of that site will come to see your bookmark and will read this post. Now if they like the post, they will also add this to their favourites. Morebookmarks will result in higher ranking and this post will come up in the top positiona. Now being on top, you can easily get noticed by millions of people and then they will come to your site as traffic. There are example of people who got more than 25000 visitors to their site in a single day just because of their one post. Trust me, it works and few times may be out of our imagination also.
How To Add Social Bookmarking Buttons To Blogger Posts :
You need to make some HTML edits in order to allow your visitors to bookmark your posts on social bookmarking sites. We can take help of some third party tools or sites who provide this bookmarking tools for blogger blogs. Simply copy their code and paste in your template. Later in this post we will also discuss about the alternate ways to do this even withoutadding any third party scripts. I will describe them step by step.
Add This
Add this provides plugins to add social bookmarking buttons. They take care of everything, you just have to add their code in your template. I guess we all have seen Add This buttons. Here is the screenshot.

Add This can share your posts with many bookmarking sites like Digg, StumbleUpon, Twitter, Delicious etc. It also allows your reader to email your article to anyone using it’s own system. To add this bookmarking plugin Add This, follow below steps.
- Go to Add This get your button page and select your button. They provide various bookmarking plugins. You can also create an account with them to get the usages statistics of this bookmarking plugin.
- Now get the code from their website and paste it in a notepad.
- Go to your blogger blog’s Template >> Edit HTML and expand your template by clicking on Expand Widget Templates.
- Now search for in your HTML template and paste your ADD THIS code just below it. This will show your bookmarking buttons just below your post.
- If you are having blogger hacks like Related Posts or showing tags/ads just below your post contents and want to show this bookmarking button below everything at the bottom of post, then you can add ADD THIS code below . Search for this code in your template and then add your ADD THIS code just after this. Check out the below example.
- If you are using old classic blogger template, then add the code after <$BlogItemBody$>. This will do the trick.
- Save your Template and you are done.
What’s Next:
What’s Next is also a blogger hack to show social bookmarking buttons in your blogger posts. It’s as popular as Add This. But shows a limited no of bookmarking buttons below your blog post. It shows social bookmarking site’s like Digg, StumbleUpon and Delicious. But you can easily configure it to show other bookmarking sites. Check out the below screenshot.
Click on the pic to enlarge it. Pic credit : eblogtemplates
Lets discuss how to add What’s Next social bookmarking buttons to your blogger post. Remember that very less no of bloggers are using this. So, adding this to your blog will get you added to the list of those limited bloggers. Read out the step by step process to add What’s Next.
- Go to Template >> Edit Html and back up your template.
- Expand your widget by ticking on Expand Widget Templates.
- Search for
- Paste the following code just below
- Change YOUR-FEED-URL-HERE with your feedburner address. If you don’t have a feedburner ID, get one here.
- Now we have to add the styling code in our style.css which will give this a organized look. Copy the following code and paste in your style.css.
- Save the template and you are done.
N.B : If you have copied the above codes correctly and did everything according to the steps mentioned by me, you can see the What’s Nextsocial bookmarking buttons below your blogger posts. And that should look like the below screenshot.
There are several other social bookmarking tools available today. You can customize them according to your wish and can edit it’s appearance as well as the different options. Below I am mentioning fewsites that give social bookmarking tools for free.
Social Front : This site gives you the option to select the social bookmarking sites you want to use. You can select as many bookmarking sites as you want from their list. This can detect your post page URL automatically and hence your readers don’t need to provide the post page URL manually.
iFeedReaders : iFeadReaders provide you a list of buttons. Select your favourite bookmarking buttons, grab the code and paste in your blogger blog. It’s simple and easy.
Share This : You need to sing up with them in order to use their widget. It comes as a widget and works fine. You can relate it with Add This, but it’s a bit more advanced. Using Share This plugin is fast and easy.
Now if you are not feeling cool about using the widgets made by other sites, there are ways ways to make your bookmarking list manually. Lets have a look on it’s screenshot first.
This will show social bookmarking links in a button. This will be in text format. To do this, copy the below code and paste just after
Now if you want to do this exact thing but want to have icons in stead of text links, then copy the below code and paste it just after
Copy the below code to have social bookmark buttons like the above screenshot.
So, here I told you about social bookmarking sites with the procedures to add social bookmarking buttons to your blogger blog. You can do this by using different blogger hacks or plugins and can also do it manually. But remember to upload the image icons somewhere at your own and use that link in your code in stead of the image links provided in the code. If you face any problems, feel free to use the comment section.
7:47 AM 0


How to add Twitter (Retweet) Button to Every Blogger Posts
blogger social bookmarking icons, so that people can spread it’s reach using different web services. There are different buttons that you can use on your blogger posts like Digg, Yahoo! Buzz, StumbleUpon, Mixx, Twitter etc. Here I’m going to show you the tutorial to add a Twitter or Retweet button to your blogger blog posts. Yes, you can use Twitter to promote your blog and you will not only get some followers to your Twitter account but will also get decent traffic to your blog.
If someone likes your post, he can click on the Retweet button to post the topic with it’s URL in his twitter account and all his followers would get notified about this. This is the simple yet effective way to promote your blog posts on twitter. There are two types of Retweet buttons available to insert in your blogger posts. One is the most common sized and another one is the small sized. Look at the below screenshot.

How to Add Twitter (Retweet) Button to Blogger Posts
Login to your blogger dashboard.
Navigate to Layout >> Edit HTML >> Expand Widget Templates
Search for
For Digg like Button, use the following code.

<script type="text/javascript">
tweetmeme_url = '';
Retweet this button on every post blogger
For Compact sized button, use these codes.

Now if you want align it to the right, use the above code in the following way.
>>>>Retweet Button Code Here<<<<
Similarly if you want to align it to the left, use the above codes in this way.
>>>>Retweet Button Code Here<<<<
You are done now. Now all your blogger posts will have a Twitter button or Retweet button. If you face any problems, use the below comments section to seek help.
7:46 AM 1
use MS OFFICE 2007 For posting On Ur Blog : Blogger Tricks

Microsoft Word 2007 can be used to publish posts on your blogs. There is no plug-in or add-ons you need to install. Word 2007 allows you to connect to the internet and publish your posts. You can create and configure an account in word and start blogging. You can use it to publish your posts for Windows Live, Blogger, Typepad, Wordpress and others. After that you just need to provide the details for your images, and its done.
Just follow these steps and you are ready to start blogging from Word 2007 ..
1. Click the Office button, and click new, choose the option “Blog Post”.
2. If you are opening it for the first time then it will automatically ask you for the configuration of an account, If not click on manage account, and click new.
3. Choose your Blog provider and provide the login details.
4. Then choose the image where you want to upload. You can choose to upload the images on your own server if your blog is a self hosted, choose “My Blog Provider” in case your blog provider gives you space to upload pics like blogger.
5. When you are done with writing, you can publish the post directly or else you can also make the post to publish as draft.
You can also create multiple accounts to publish posts to separate blogs .
This is one great way by Microsoft to step into the blogosphere.
Happy Word Blogging !!
9:47 AM 3


How To add footer wrapper In Blogger - learn Latest Computer And Mobile Hacking Tricks
•Login to your dashboard
•Create a blog or select a existing blog, choose minima template
•Now goto Layout > EDIT HTML
Remove
#footer {
width:660px;
clear:both;
margin:0 auto;
padding-top:15px;
line-height: 1.6em;
text-transform:uppercase;
letter-spacing:.1em;
text-align: center;
}
and ADD the below code before ]]>
#footer-wrapper {
width:670px;
margin:0 auto;
padding:5px;
}
#footer1{
width: 220px;
float:left;
}
#footer2{
width: 220px;
float:left;
}
#footer3{
width: 220px;
float:right;
}
Now you have to Remove
< div id='footer-wrapper'>
< b:section class='footer' id='footer'>
< /b:section>
< /div>
and Then ADD the below HTML code before </body>
< div id='footer-wrapper'>
< div id='footer1'>
< b:section class='footer1' id='footer1' preferred='yes'>
< /b:section>
< /div>
< div id='footer2'>
< b:section class='footer2' id='footer2' preferred='yes'>
< /b:section>
< /div>
< div id='footer3'>
< b:section class='footer3' id='footer3' preferred='yes'>
< /b:section>
< /div>
< /div> <!--End of Footer Wrapper-->
4:34 AM 9
How to Create A Multi tabbed Widget Recent posts widget IN Blogger - Learn latest Computer And Mobile Hacking tricks
1. Firstly, Log in to Blogger. Now go to Layout and then click on "Edit HTML" tab.
Then download the present template as a backup.
Now find [CTRL+F] this code:
]]></b:skin>
JUST BEFORE THIS CODE, paste the following code:
// Copyright (C) 2005 Ilya S. Lyubinskiy.
// All rights reserved.
// Technical support: http://www.php-development.ru/
div.TabView div.Tabs
{
height: 24px;
overflow: hidden;
}
div.TabView div.Tabs a
{
float: left;
display: block;
width: 90px; /* Width top main menu - Tab Buttons*/
text-align: center;
height: 24px; /* Height top main menu - Tab Buttons*/
padding-top: 3px;
vertical-align: middle;
border: 1px solid #000; /* Top Main menu border color */
border-bottom-width: 0;
text-decoration: none;
font-family: "Times New Roman", Serif; /* Top main menu font */
font-weight: 900;
color: #000; /* Top main menu font color */
}
div.TabView div.Tabs a:hover, div.TabView div.Tabs a.Active
{
background-color: #F4F4F4; /* Top main menu background color */
}
div.TabView div.Pages
{
clear: both;
border: 1px solid #6E6E6E; /* Content Border color */
overflow: hidden;
background-color: #FBF1A4; /* Content background color */
}
div.TabView div.Pages div.Page
{
height: 100%;
padding: 0px;
overflow: hidden;
}
div.TabView div.Pages div.Page div.Pad
{
padding: 3px 5px;
}
The text in red color are comments, for your help, as you can edit those numbers or color codes yourself, so that they can match your blog's layout.
Download this File: Tabview.js
And upload it to HotLinkFiles.com, to get a DIRECT LINK to the file.
Now find (CTRL+F) this in the template;
</Head>
And immediately Paste the follow ing..
<script src='http://hotlinkfiles.com/......./tabview.js' type='text/javascript'/>
Replace the link in RED, with the DIRECT LINK of the Tabview.js file
That's it, Now SAVE the template.
2. The second part is for positioning the widget (whether in sidebar, above/below the post body etc.)
For this, click on "Page Elements" tab, and then "Add a Gadget" wherever you like.
Select the widget of the type "HTML/JavaScript"
Now paste the following code in to the widget:
<form action="tabview.html" method="get"&g
<div class="TabView" id="TabView"&g
<div class="Tabs" style="width: 350px;"&g
<a&gTab 1</a&g
<a&gTab 2</a&g
<a&gTab 3</a&g
</div&g
<div class="Pages" style="width: 350px; height: 250px;"&g
<div class="Page"&g
<div class="Pad"&g
Content 1.1 <br /&g
Content 1.2 <br /&g
Content 1.3 <br /&g
</div&g
</div&g
<div class="Page"&g
<div class="Pad"&g
Content 2.1 <br /&g
Content 2.2 <br /&g
Content 2.3 <br /&g
</div&g
</div&g
<div class="Page"&g
<div class="Pad"&g
Content 3.1 <br /&g
Content 3.2 <br /&g
Content 3.3 <br /&g
</div&g
</div&g
</div&g
</div&g
</form&g
<script type="text/javascript"&g
tabview_initialize('TabView');
</script&g<span&gwidget by<a href="http://bloggerstop.net"&g BloggerStop</a&g</span&g
You can change the colored content as per your wish, and to remove or add any further tabs,
Either delete Tab3 line, and 3.1, 3.2 and 3.3 lines
or Add Tab 4 and 4.1 etc lines.
Save the widget, drag and change it's position if you want.
Its all done, congo.....
9:01 AM 0
Include Flash Files In Blogger Posts- Learn Latest Computer And Mobile Hacking Tricks
■Now copy the code given below in your favorite text editor.
_________________________________________________________________________
<pre>
1: <object>
2:
3: <param value="http://abc.googlepages.com/file.swf?clickTAG=http://www.xyz.com/lp/row.asp" rel="nofollow" name="movie"/>
4:
5: <embed
6: width="160" src="http://abc.googlepages.com/file.swf?clickTAG=http://www.xyz.com/lp/row.asp" rel="nofollow" height="600" type="application/x-shockwave-flash">
7: </embed>
8:
9: </object>
_____</pre>____________________________________________________________________
■Replace http://abc.googlepages.com/file.swf? with the full path of your googlepages A/C. So if your Google A/C email is steve@gmail.com and file name is apple.swf then this part of the URL should become http://steve.googlepages.com/apple.swf?
■If you just want to serve the flash file on your blog this will be enough and you can skip the next 2 steps.
■But, if you are serving flash file as an advertisement on your blogger blog then you will need a clickTag. The swf files use the clickTag method to get the landing page URL. Replace clickTAG=http://www.xyz.com/lp/row.asp with the landing page of your advertiser.
■So the value of src should become http://abc.googlepages.com/file.swf?clickTAG=http://www.xyz.com/lp/row.asp , if you are serving this as an advertisement and should become http://abc.googlepages.com/file.swf? if you are just showing this on your blog with no landing page.
■Last but the most important part is that you should never forget to use type="application/x-shockwave-flash" while
embedding any flash file. If you remove "type", though firefox will show up correctly but IE6 will not render anything.
■Now place this code in "Configure HTML/Javascript" widget of blogger.
2:16 AM 0
Recent Posts And Recent Comments Widget For Blog - Learn Latest Computer And Mobile Hacking Tricks
You can easily customize whether or not you would like to display thumbnails, post summaries, and the number of comments for each post along side the titles.
Features and Customization:
1. The Recent Post Titles
2. Display Post Thumbnails
3. Choose which blog posts to display (choose URL).
4. Display Post Summaries
5. Length of Summaries
6. Display Post Date
7. Display Number of Comments on each post
8. Display Read More Link
9. Display separator between posts
10. Number of Posts do Display
11. Determine height
Install the Recent Post Widget on Your Blog:
This widget is very simple to install. Just simply click the button below to choose which blog you would like to implement it on.
add to blogger
12:29 AM 0
How To Post Larger (HQ) Images In Blogger - Learn Cool Computer And Mobile Hacking Tricks
Normally, If you upload a large image to blogger(with large thumb size selected), it will automatically resize it and then post it as thumbnail . But, the image quality of the resized image is very poor. So, to make the image look more clean and sharper, this trick will come handy.
So, lets learn how to do this..
1.First, calculate how much image size(large) you want to display ( normally, its just a bit less than your main body width). Suppose, take this blog as an example, the main body width is about 570px. So, the maximum width to post a large image is 570px. But, to make the image looks nice, we have to give some padding to it.so,choose the width which is a bit less than the post body width.. like 560px.
Now, Go to Layout » Edit html
Find this
]]>
Add this before that line:
img {
max-width: 560px;
width: expression(this.width > 560 ? 560: true);
}
Change the value in red depending on the previous step.
Note: Do check if you have the img{ tag already in your template. If its there, just add the additional couple of lines to it.
max-width: 560px;
width: expression(this.width > 560 ? 560: true);
Save the changes.
2. Now, while doing your posts, upload the images normally like you did previously. Once the image is uploaded, go to Edit html tab, and the image code will look something like this

All you have to do is Just remove that bolded text (width and height attributes) and replace s400 to s800.
So, the final code looks like this
Here You Are Done.
ANy comemnts?
10:28 AM 0
Show Your Online Status On Your Blog- Learn Latest Computer And MObile hacking Tricks
You have a Yahoo Messenger ID, and you wish to add you YM ID status to your blog. You can create you Yahoo Messenger status use animation picture and can be installed easily in your blog. For example, you can use following picture to present online status your YM ID in your blog.


yahoo-online-status-1 yahoo-online-status-2 yahoo-online-status-3yahoo-online-status-4indicator-11-onlineindicator-17-offline
Follow this steps to create yahoo messenger status
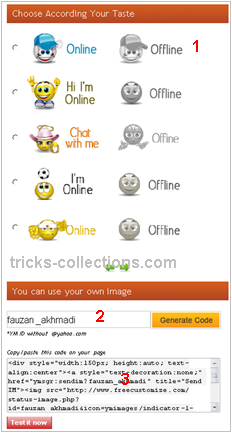
create-yahoo-messenger-status
1. Open http://www.freecustomize.com and select onf of the picture in this website (available more than 20 picture)
2. Type your Yaho Messenger ID without @yahoo.com then click “Generate button”
3. Copy generated code and add to your blog.
How to add the generated code to your blog ? Follow this tutorial.
Add yahoo Messenger Online status to wordpress
In this tutorial I using wordpress themes with widget ready, if your themes no widget ready you must added the code manually.
1. Login to your WordPress blog
2. Select Appearance, then click widget
3. Add new text widget, then click edit.
4. Copy the generated code. Click Save. Open your blog or reload your blog to view online status widget in your blog.
Add yahoo Messenger Online status to Blogspot
1. Login to your blogspot. Click layout at blog to be installed YM status.
2. Click add new gadget, select html/javascript .
3. Copy generated code and save
12:46 AM 0
Add a go to top and go to bottom button On Your Blog- Learn Latest Computer And MObile hacking Tricks
a) CSS Code: Copy and paste the following code between <head> and </head>. Most advisable place would be just before
]]></b:skin> or </b:skin>
background:url(http://wolverinehacks.googlepages.com/arrow_top.gif)no-repeat;
display:block;_display:none;
position:fixed;
z-index:9999;
text-indent:-9999px;
width:17px;
height:17px;
overflow:hidden;
outline:none;
left:3px;
bottom:30px;}
.gotobottom {
background:url(http://wolverinehacks.googlepages.com/arrow_down.gif)no-repeat;
width:17px;
height:17px;
display:block;
_display:none;
position:fixed; z-index:9999;
text-indent:-9999px;
overflow:hidden;
outline:none;
left:3px;
bottom:5px;
}
b) HTML Code: Copy and paste the following code between
<body> and
</body>.
Save it and check your blog.
How to customize CSS and HTML Code
a) CSS Code:
background:url(http://wolverinehacks.googlepages.com/arrow_top.gif)no-repeat;
display:block;_display:none;
position:fixed;
z-index:9999;
text-indent:-9999px;
width:17px;
height:17px;
overflow:hidden;
outline:none;
left:3px;
bottom:30px;}
.gotobottom {
background: url(http://wolverinehacks.googlepages.com/arrow_down.gif)no-repeat;
width:17px;
height:17px;
display:block;
_display:none;
position:fixed; z-index:9999;
text-indent:-9999px;
overflow:hidden;
outline:none;
left:3px;
bottom:5px;
}
1. Change the background image link in red to the desired image source.
2. To change the position of these Buttons, change the values as per ur requirements.left:3px;bottom:5px;. For example if you want to place these buttons to right bottom, then replace left:3px;bottom:5px; to right:3px;bottom:5px;
b) HTML Code:
Go to bottom button is set to #footer. If you do not have #footer in your CSS then, search for #footer-wrapper or #footer-wrap.
7:35 PM 0

 Posts
Posts

